My sons loves driving their cars round and round the room. One day I decided to use tape to give them some roads to drive on. B spends so much time making up stories that I wanted to give him a stage for his police vehicles, trucks and buses. It was a huge success and we all had lots of fun with it.
We started with just one road marked on the floor with masking tape. Then we created a ‘T’ junction and then just kept on building across the room. B enjoyed going around with his bus. He stopped in the same place every time for the bus stop - people got on, people got off. Eventually he asked for the tape to mark the stopping place.
We chose a place for a farm so that little R had a place to play too. He likes to drive cars but has no regard for the rules and regulations of the road. He often crawls across the whole set up. B has to wait for ‘the pedestrian crossing the road’ (not always an easy task). Sometimes we build a little train track at one end of our town.
Traffic lights, police stations, fire station, a house with a garden - the additions go on and on. We create different stories every time. The main characters are usually the bus or the police car. B seems to choose depending on his mood. When he has a lot of energy to use up, the police car zooms around with the siren on full blast. There can be a lot of destruction and the noise reaches real siren levels.
At other times the bus drives very carefully around the town. B brings the bus slowly to the stops making sure the tyres are right at the edge of the road. He talks about people getting on and off with prams and dogs. Somebody might be running for the bus so he waits for them - or not!
Showing posts with label boy. Show all posts
Showing posts with label boy. Show all posts
Friday, March 29, 2013
Wednesday, September 26, 2012
Being Creative with Chestnuts and Following the Paths of the Imagination
Over the last few week chestnuts have been hammering down from the enormous tree behind our apartment. One collection gave us over 300 of these beautiful fruit. I wanted to make some chestnut figures of animals and people. (kikisweb.de gave me some knowhow.) But we actually ended up making roads and racing cars around.
To make animals with chestnuts I needed scissors and cocktail sticks. I used the scissors to make a little hole in the outer shell and then the cocktail stick went in pretty easily, but not easily enough for a three year old to do. I had to press the stick in with the hard floor, and it often broke, and it was hard to remove. So for my three year old it got a little boring. He liked making people, but the “little man” wouldn’t stand up, so we made it into a snowman. We also made a spider and a cat. There is a special tool available for making holes, but I didn't order it in time! Try this Drill for Chestnuts if you need one.
 |
| Sticking in Cocktail Sticks |
To make animals with chestnuts I needed scissors and cocktail sticks. I used the scissors to make a little hole in the outer shell and then the cocktail stick went in pretty easily, but not easily enough for a three year old to do. I had to press the stick in with the hard floor, and it often broke, and it was hard to remove. So for my three year old it got a little boring. He liked making people, but the “little man” wouldn’t stand up, so we made it into a snowman. We also made a spider and a cat. There is a special tool available for making holes, but I didn't order it in time! Try this Drill for Chestnuts if you need one.
 |
| Snowman |
 |
| Spider |
 |
| Cat |
The next day I started to make a train, but it looked more like a caterpillar, and he was more interested in rolling around in a big pile of chestnuts. So that is what he did.
 |
| Big Pile of Chestnuts |
Then we counted them. This became a really interesting activity for him. We had never had so many things to count before and he was interested in how we could possibly count so many items! We put them in rows of 10 as he is comfortable with this number. He helped as we went up to 100.
 |
| 100 Chestnuts |
Then he watched as I did some more rows, then played around with his cars as I did the rest. In the end he politely listened as I told him how many we had (316) and then drove his bus straight though them all. He loved destroying the neat rows!
 |
| Bus in Chestnuts |
So we made some roads as he wanted to transport some chestnuts in his trucks. We drove them along the paths we made. This was such a simple thing to do yet sparked his intrest. As he drove his cars around, he moved carefully and with great control so as not to destroy the road edges.
 |
| Loading a Truck with Chestnuts |
 |
| Road Made with Chestnuts |
Later on we came back to the sea of chestnuts and explored them in more detail. When I started drawing faces on them, he gave them names. Then we made up a few stories with them. Again we had found an unplanned game and created a lot of laughter.
 |
| Faces on Chestnuts |
Much of the play we did with the chestnuts was made up as we went along. I had wanted to make more things and get crafty, but maybe next year he will be a more willing sculptor. This year, pretend play is definitely top of the list.
 |
| Cars Driving through Chestnuts |
Our big box of chestnuts gave us many surprise opportunities for counting, pretending and conversation. My first thoughts had been to make things, stick things and create something to keep. But sometimes I have to remember that the creative process takes different paths, often unexpected paths, and each one is food for the imagination.
Thursday, July 5, 2012
More Painting with Cars
Our first painting with cars activity was a brilliant success. B added more and more paint to the masterpiece each time we came back to it and discovered new ways to move the cars, the paint and himself. It was also a great way to explore colours. Just before we washed the plasic canvas, we went a little crazy with the paint.
On this day, he chose red and green paint. As we sat down with our equipment - paint, cars and plasic sheet - I asked spontaneously: would you like to sqeeze the paint bottle? Well, of course yes. Normally I do that part, but I thought it would be a nice change for him and I was right.
On this day, he chose red and green paint. As we sat down with our equipment - paint, cars and plasic sheet - I asked spontaneously: would you like to sqeeze the paint bottle? Well, of course yes. Normally I do that part, but I thought it would be a nice change for him and I was right.
 | |||
| The Big Squeeze of Paint |
It was lovely to see him so focussed on getting paint out, and I was so busy taking photos, that I forgot to say stop!
We ended up with a huge blob of red paint which he drowned his cars in.
We ended up with a huge blob of red paint which he drowned his cars in.
 |
| Car completely covered in paint |
 |
| Some wonderful tracks made by cars |
Often, he doesn’t like to get too messy, but once all his cars were drenched, and his hands covered, and after he slipped and we laughed so much, he didn’t seem to mind.
 |
| The big blue bus always gets a look in |
 |
| A terrible accident? Only with a bottle of paint |
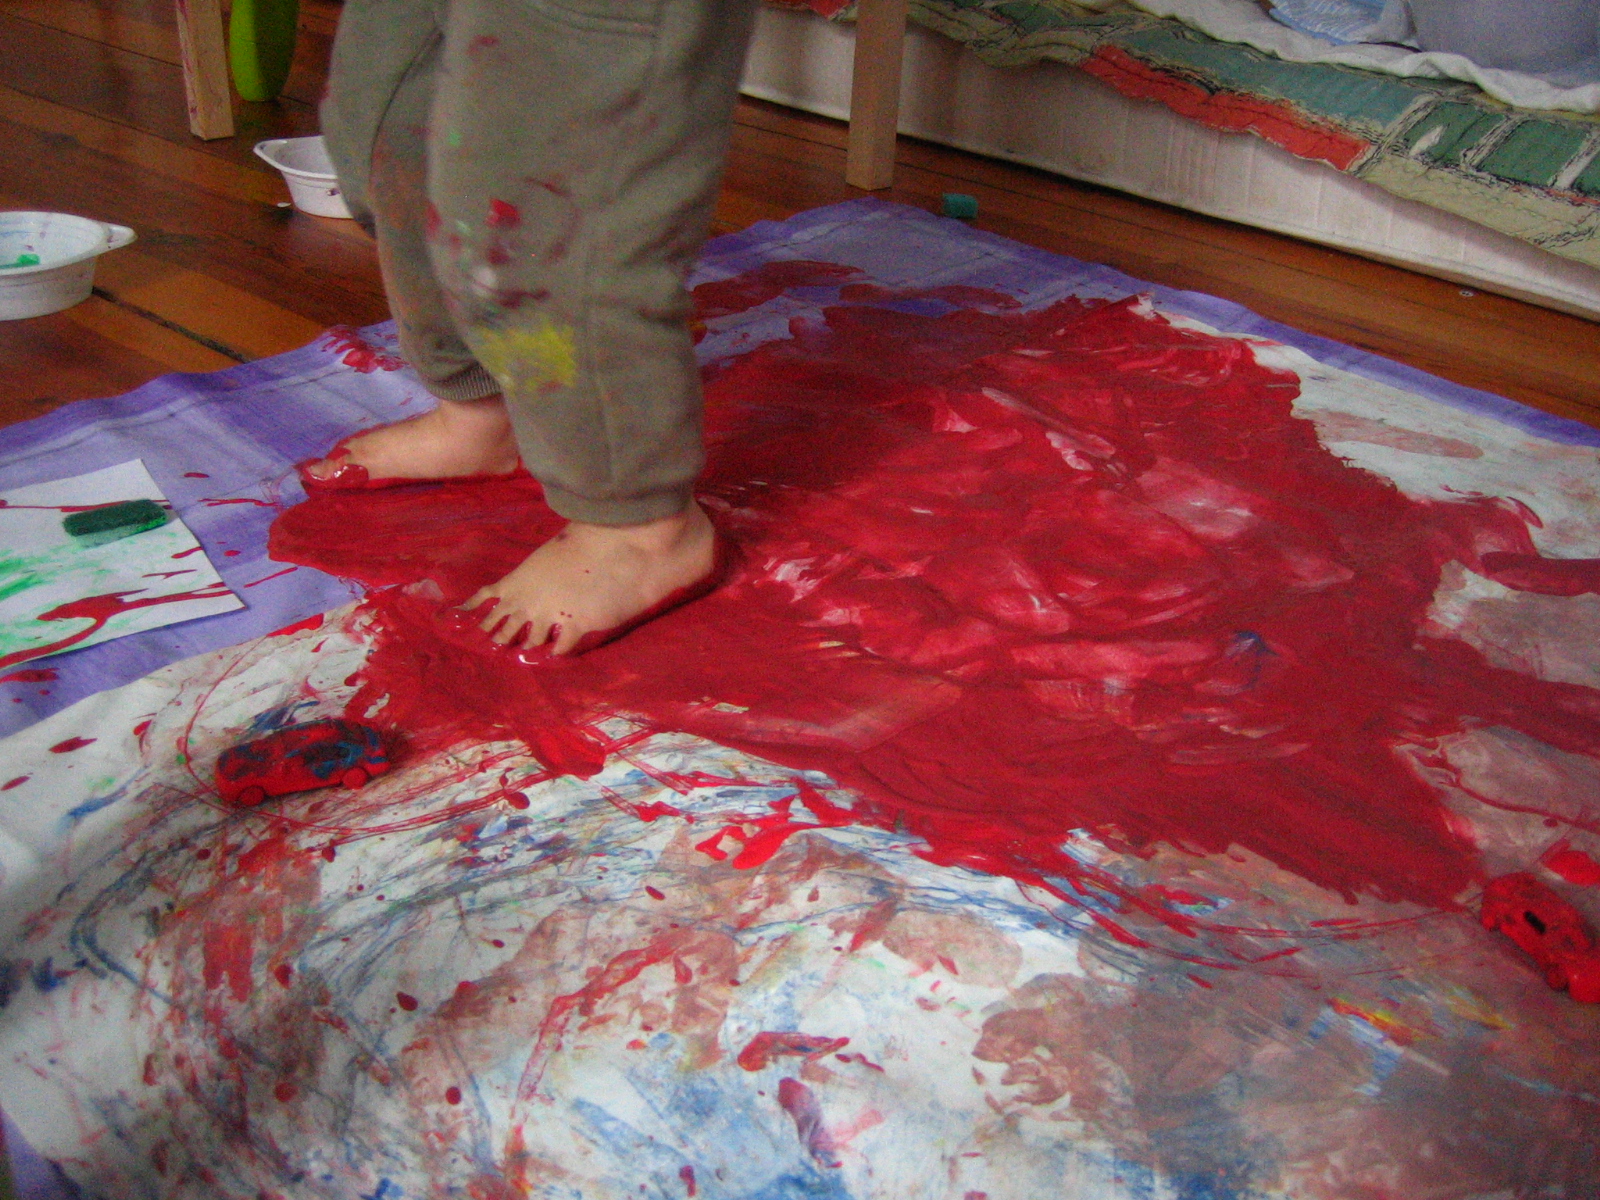 |
| And then it was time for a slide |
The clean up was a family effort. We carried all paint covered items, including a messy toddler, outside to be cleaned off with hot soapy water. And so the fun continued. It took a while, but soon everything was clean enough, and B dry enough to come inside to hunt for footprints and dots of red paint on the floor. With a wet wipe in hand he managed to remove most of it. (Aren’t wet wipes fantastic for this sort of thing?) The activity took up the whole morning and we were more than ready for a long midday rest.
B had a wonderful time painting with his favourite toys and built on the skills he had started when we first did this activity. I hope that he was able to connect his ideas and stories as we didn't clean his 'canvas' between sessions.
Monday, July 2, 2012
Matching and Measuring with Toy Vehicles
I’m always on the hunt for activities involving vehicles. Although I love watching my son drive them around while making up stories, I like to encourage other play too. He has enjoyed matching things for a while now, and has recently become very interested in ‘bigger’ and ‘smaller‘, so when I found a matching and sizing game with circles on one of my favourite sites: Irresistible Ideas for play based learning. I couldn’t wait to give it a go and then try to involve his cars.
First he helped me choose an assortment of vehicles of different sizes. This took a while as we talked about how to measure them and how many we needed to fit onto a piece of A3 paper. After sorting, measuring and arranging we ended up with 13 vehicles.
Then he watched as I drew around them. He enjoyed this as asking for us to draw around things has been a favourite of his for a long time. Thirteen vehicles on one piece of paper was a thing of wonder for him.
I drew with pencil first but then went over it with pen to create a good photo. I did find that I lost some of the detail that the pencil picked up though, so I would definitely draw in pencil next time.
Then I left everything out for him to play with when he wished. I wanted him to have a go straight away, but he was too busy driving the ‘car bus’ (a huge truck he uses to transport cars) as some of the cars had broken down and needed a lift to the mechanic! He did do it eventually, I just had to be patient:
We had lots of fun with this activity and I can imagine doing it again with other objects. He enjoyed the original circle idea, so we will try other shapes too. Themes would be fun too, like food or painting equipment. Even if we collected random object from around the house or park, I think we would benefit greatly from this simple matching game.
First he helped me choose an assortment of vehicles of different sizes. This took a while as we talked about how to measure them and how many we needed to fit onto a piece of A3 paper. After sorting, measuring and arranging we ended up with 13 vehicles.
 |
| The Chosen Cars |
Then he watched as I drew around them. He enjoyed this as asking for us to draw around things has been a favourite of his for a long time. Thirteen vehicles on one piece of paper was a thing of wonder for him.
 |
| After drawing around all the vehicles |
I drew with pencil first but then went over it with pen to create a good photo. I did find that I lost some of the detail that the pencil picked up though, so I would definitely draw in pencil next time.
Then I left everything out for him to play with when he wished. I wanted him to have a go straight away, but he was too busy driving the ‘car bus’ (a huge truck he uses to transport cars) as some of the cars had broken down and needed a lift to the mechanic! He did do it eventually, I just had to be patient:
 |
| All in place |
Thursday, June 28, 2012
Using Play Dough to Make Train Accessories and other things
I recently decided to make an effort to bring more play dough into our playtime after being inspired by The Imagination Tree (again!).We play a lot with trains, we talk a lot about trains and train are often the first choice for ramdom You Tube video watching. We have a train set but often find we have accessories missing as our games develop. So we started making train set accessories out of play dough.
Here is our first creation - a crossing:
We used this no-cook recipe (scroll down a little!) for the ramps and the gate holders, a cocktail stick for the gate, and a foam bead from a threading set with a broken cocktail stick for the hinge. I was really impressed with our work and wanted to make more. However, my nearly three year old had moved on to other things. So we made some random objects:
But we'll be adding to our train set soon. We need a lot of accessories as the train stories just keep on growing. Do you have any ideas? Please comment and let me know.
In addition to the marvelous wonders of play dough, which you can read about via the links above, we also:
For more play dough ideas, have a look at others who took the PLAY DOUGH PLEDGE
*We read about Wigglily Woos in this Sir Charlie Stinky Socks book by Christina Stephenson
Here is our first creation - a crossing:
 |
| Play Dough Level Crossing with Plastic Light |
 | ||
| A stick, a spacecraft, an imprint of something I can't remember and a couple of wiggily woos* |
In addition to the marvelous wonders of play dough, which you can read about via the links above, we also:
- talked about height and width as we measured the parts
- discussed the purpose of gates and hinges
- waited for parts to dry before we could play with them
- extended the possibilities for his pretend play
For more play dough ideas, have a look at others who took the PLAY DOUGH PLEDGE
*We read about Wigglily Woos in this Sir Charlie Stinky Socks book by Christina Stephenson
Subscribe to:
Posts (Atom)